Shii Cho
Pronunciation - Sh-eye Cho
Shii Cho is the most basic form of lightsaber combat, and as such is a good form to use if other forms fail to defeat an opponent. Shii Cho is the first form taught to the younglings, and focuses on stances, and basic body zone attacks. Teachers also use Shii Cho to help teach their students to act with their feelings, rather than with their senses.
BODYZONES
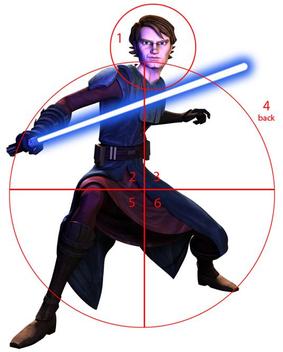
Body Zones The body is divided into 6 zones where attacks or parries occur:
1. Head (Slashing attacks to the neck are considered Zone 2 or 3 attacks)
2. Right arm & side
3. Left arm & side
4. Back
5. Right leg
6. Left leg
Attacks and parries are described in terms of the body zone they concern. "Attack 1" is a blow to the opponent's head, "parry 2" the block of an attack to your right arm or side, and so on. Attack zones are those you see on your opponent, while parry zones are those of your own body.
HOLDING THE LIGHTSABER
Most actions are taken with the lightsaber held in both hands, the lower, left hand does all the work while the right guides the blade. Interestingly enough, there is no left handed grip in Japanese martial arts. In fact, a left hander actually has a slight strength advantage with a slight loss of directional control with this grip. Vader switched his grip when fighting Kenobi in ANH, probably for cinematic reasons, but it could be that he wanted to gain a psychological advantage over his old Master, who would certainly be well familiar with his normal fighting techniques.
The proper grip is firm, yet relaxed until just before the moment of contact with your opponent's body. Then, the grip tightens, not unlike wringing water from a towel, as the wrists transmit the final snap of power into the blow in a kind of whipping action.
- Grip the base of the handle using your left hand with no part protruding below the smallest finger. The smallest finger grips most tightly, with grip decreasing in strength up to the index finger and thumb. The web of skin between thumb and forefinger does not touch the handle.
- Your right hand grips just below the guard. The strength of grip is similar to the left hand. Some martial artists have the right forefinger very loose, crooked almost as if it were on the trigger of a gun.
- Your hands should be about 2 finger widths apart. This is often where the switch is located on some lightsabers.
- Your left hand is the primary source of power. Your right hand guides the blade.THE
THE FORCE
In oriental martial arts, all energy comes from your center of gravity, about 50mm (2 inches) below your navel centered inside your body. This is the point about which all energy moves. Unless you are moving, this point is almost still except when moving up or down. When you apply force you move this point down. In other words, all moves start by moving this point up then down as energy is expended.
Most Japanese martial arts also make heavy use of the voice using a yell that accompanies all aggressive strike called "kiai." This loud shout causes the diaphragm to contract, forcing air out of the chest and adding structural strength to the body.
You should learn each move so you can perform them by instinct instead of having to think about it, because in a duel you don't have time to think, and must rely on your skill and instinct.
STANCES
Stances All strength and propulsion in the martial arts starts in the feet. The stance is important in fighting, as it not only provides balance but also the energy to be placed into an attack. It is the basis upon which all lightsaber combat is placed. It involves footwork, the alignment of the legs and torso, the straightening of the back, and the loosening of the arms so that they can snap into the desired position. Keys to good stances include: allowing the dominant foot to be the main source of propulsion, keeping the knees bent, keeping the back straight, and constant, calm breathing.
The Stance Grid:
Rear Center Forward Aggressive Aggressive Back Aggressive Neutral Aggressive Forward Neutral Neutral Back Jedi Ready Neutral Forward Defensive Defensive Back Defensive Neutral Defensive Forward
Jedi Ready
The most basic of all Jedi stances - also called "basic neutral" - this one employs stepping back with the dominant foot and drawing the lightsaber so that it is parrying on the dominant side. Weight is distributed evenly between the feet. It is natural that the dominant shoulder be rolled slightly back. The hilt of the lightsaber is held down level with the waist with the tip of the lightsaber pointed at or slightly over the head of the target. This stance is similar to the chûdan-no-kamae in kendo, except in the kendo form you step forward with the dominant foot as you draw the blade. This is evidence of the Jedi only using lightsabers as a matter of defense of themselves and others, whereas in kendo the purpose is for attack.
In Episode I, Obi-Wan Kenobi always used this stance when drawing his lightsaber, and hastily moved into it as well. This shows how undisciplined he was as a padawan. His feet shifted oddly so that his rear foot was not in a straight line pointing forward, his back was hunched forward (this reduces both balance as well as the flow of energy to-and-from the internal organs), and he held the point of his lightsaber so high that it partially obscured his vision. It is possible he is attempting an aggressive forward stance. By Episode II, he has changed more so into his former master's style.
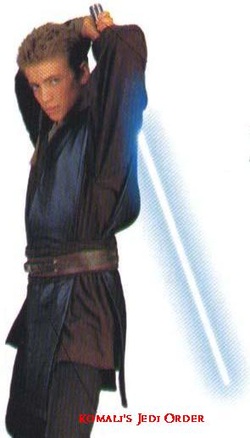
Neutral Forward
Very similar to Jedi ready, except that the dominant foot is forward - identical to chûdan-no-kamae - with the lightsaber hilt close to the waist, the blade pointed to the enemy. Slightly more weight is on the front foot than the rear, which means that the dominant leg is still the one that propels the attack.
Anakin uses this stance in Episode II. He centers himself by setting his stance and swinging his blade slowly from behind his back, over his head, down centerline of his body, and settling the lightsaber in place.
Defensive Neutral
A good defensive posture, defensive neutral is ready for any occurrence but is also non-threatening. The dominant foot is drawn back and pointed approximately forty-five degrees out to the side. Approximately sixty-percent of the weight is on the back foot. The dominant shoulder is rolled back as the blade is drawn. The lightsaber is held vertically next to that side of the head, in the pocket created by the shoulder. This form is almost identical to the hassô-no-kamae stance found in kendo.
In Episode I, Qui-Gon Jinn uses this stance when drawing his lightsaber. His form is almost flawless, showing the years of training and discipline spent acquiring his skill. He holds his lightsaber back in such a fashion that his eyes are able to scan a wide forward arc, looking for targets and watching attacks. With his long legs, he is able to hold his feet wide, ready to spring forward at a moment's notice. In Episode II, Obi-wan has followed in his master's footsteps and picked up this stance, and in Episode III when he is fighting Anakin just before Anakin jumps on to the same platform you see Obi-Wan using the stance.
Defensive Back
The best defensive posture in sword combat, defensive back is nigh-impossible to penetrate and nigh-impossible to launch an attack from. The hilt of the blade is rasied high towards the face, the point of the blade pointed diagonally down at the ground. From this position slashing strikes aimed at the torso can be easily blocked, and stabbing strikes can be quickly parried with wide, sweeping moves from which the defender can quickly move forward into a better stance. Another advantage of this stance is that the blade can be quickly swung all the way around the torso to block attacks from all directions.
Agressive Neutral
A very threatening stance similar to the Jedi ready stance. This involves standing with more of the weight on the front foot rather than the rear. The arms are held so that the hilt of the lightsaber is in line with the solar plexus, and the point of the lightsaber is directed at the target's head. The distance from the body to the lightsaber is greater than most stances. This form is not very useful in conventional combat, but is very deadly in lightsaber-on-lightsaber combat.Darth Sidious uses this when he is fighting Mace Windu.
Combined with the elegant, flowing, and swift motions of Form II, this stance allows Count Dooku to keep his guard up while pressing the attack. Even when facing an Anakin Skywalker armed with two lightsabers, he is able to gain an advantage by keeping his enemy at arm's length.
Sidious uses Agressive Neutral against Yoda
Agressive Back
A more radical stance than most, aggressive back is a low posture from which a swift attack can be launched. The back foot is pointed out almost ninety-degrees from the body and is holding over eighty-percent of the weight. The front foot is extended forward, almost straight. The lightsaber is held on the dominant side, right beside the head, its blade facing directly forward. Like aggressive neutral, this stance is only useful for taking on a single enemy armed with a lightsaber, especially since it obstructs view of the right side of the body.
This is Obi-wan's stance from Episode III. He uses it mainly in facing General Greivous, alternating at times with aggressive neutral. This leaves him open to attack from surrounding droids, but he realizes that danger is minute in scope to giving Grievous one inch of advantage.
VELOCITIES AND DULONS
Velocities
To develop lightning reflexes and tight control, Jedi face each other in drills called velocities. The tenth velocity sequence takes each opponent through a series of attacks and parries and is repeated in turn at ever greater speed until one opponent is felled or yields with the declaration, "Solah." That is, Jedi in training run lightsaber velocities endlessly to increase their key skills and physical stamina.
Building on these basics, Jedi can go beyond what is physically possible, allowing the force to flow through them. A Padawan practices for the trials of passage using Dulon: Solo sequences of moves in which the opponents are only envisioned. The patterns of velocities and Dulon prepare a Jedi for the unpredictable realm of combat.
Dulons
Where as with velocities you train with a partner, a dulon is training by yourself. Practising each of the different techniques one by one until you know them well, then having a duel without an opponent, where you use the techniques you have learned. If they are attacking techniques you move forward or stay still, if defensive, you move backwards or stay still.
ATTACK
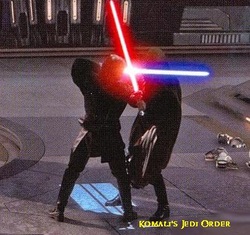
The Saber Lock
A saber lock can be either defensive or offensive. Both opponents lock their lightsabers together and both try to push through the others defences, often using the opportunity to glare at their opponent. Dark Side users often take the opportunity to mock and jeer at their opponent.
A saber lock can be either defensive or offensive. Both opponents lock their lightsabers together and both try to push through the others defences, often using the opportunity to glare at their opponent. Dark Side users often take the opportunity to mock and jeer at their opponent.

Vertical Slash -
Puting the lightsaber over your head, in line with your spine, bring the saber down, slicing vertically and end with your hands at waist height with the blade in front of your face. This move is quite powerful but does leave your body vulnerable for a short while.
Horizontal Slash
Bring the saber behind your back, keeping the blade horizontal. The handle should be just below shoulder height. Bring the saber round quickly slashing at your opponents right arm.

Diagonal Hit
With the handle at chin height and the blade vertical infront of your face, bring the blade down at your opponents right arm.
Horizontal Slash
Bring the saber behind your back, keeping the blade horizontal. The handle should be just below shoulder height. Bring the saber round quickly slashing at your opponents arm.

Horizontal Slash
This attack is just Attack 2 or 3, but aimed at your opponents back, and should only be done if the back is open for such an attack.
Basic Attack
Bring the saber behind your back, keeping the blade horizontal. The handle should be just below shoulder height. Bring the saber round quickly slashing at your opponents leg.

Basic Attack
Bring the saber behind your back, keeping the blade horizontal. The handle should be just below shoulder height. Bring the saber round quickly slashing at your opponents leg.
DEFENCE
High Parry
Hold the handle with one hande above and infront of your head, arm stretched out. The blade should be horizontal. This will block any vertical slashes attacking the top of the head.
Diagonal Parry
Hold the saber high with the handle at shoulder height. The blade should be diagonal. This can be done to either the left or right side.
Basic Block
Start with the handle at chest height and the blade vertically upwards. Then swing the blade down so the blade swings to the left and ends up pointing down almost vertical in front of your right arm or side.
Vertical Parry
This simpy involves keeping the handle at waist height and moving the saber to defend your right arm.
Diagonal Parry
With the handle at chin height and the blade vertical infront of your face, bring the blade down right arm, defending your right side.
Basic Block
Start with the handle at chest height and the blade vertically upwards. Then swing the blade down so the blade swings to the left and ends up pointing down almost vertical in front of your left arm or side.
Vertical Parry
This simpy involves keeping the handle at waist height and moving the saber to defend your left arm.
Diagonal Parry
With the handle at chin height and the blade vertical infront of your face, bring the blade down left arm, defending your left side.
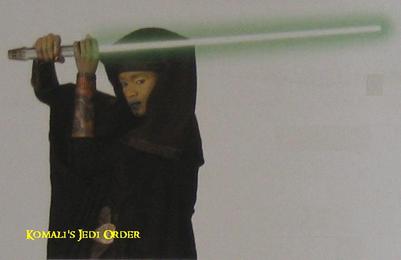
Overhead Parry
Bring the saber over your head with both hands so that the saber is vertical, with the blade parallel to your spine.
Basic Block
Start with the handle at chest height and the blade vertically upwards. Then swing the blade down so the blade swings to the left and ends up pointing down almost vertical in front of your right leg.
Basic Block
Start with the handle at chest height and the blade vertically upwards. Then swing the blade down so the blade swings to the right and ends up pointing down almost vertical in front of your left leg.
Kai Kan Drop Stance - Defence Body
Hold the blade horizontal with the handle to the left of your head at shoulder height. The blade should run just in front of and below your chin

Below is some of Master Joshua Rausch's training videos the Form of shii chovideos on Shii Cho
for more of Master Joshua's "The Jedi Way" You Tube videos follow the link HERE
